Anyone who has a made a dashboard in Excel before has probably experienced this problem: a dashboard that fits nicely on your screen but not so nicely on your client’s. Yes, it’s the age old problem of differing monitors, resolutions, font-sizes and other settings that make what looks great on your screen look too small or too big on another’s. I’ve seen a few ideas to get around this problem that include resizing the spreadsheet controls to resizing the Excel window. Here’s my idea.
Most likely, your current Dashboard is already zoomed to its “best view.” By that I mean your current spreadsheet is at the proper zoom level such that your dashboard is displayed most effectively. If it’s not, go ahead and set it to the optimal zoom for your screen. Use the picture below as a guide for your dashboard and adjust the zoom levels (down in the lower-right corner) accordingly.
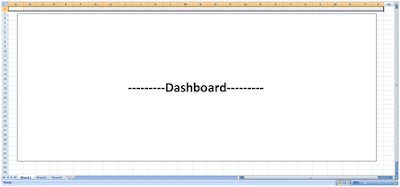
In this next step you’ll want to take note of the columns spanning your screen. Above, you’ll see that I’ve selected columns “A1:Z1,” but left the final column, “AA1” unselected. I would suggest highlighting all except for the last column as I did above—when we are finished, the last column will act as a nice margin. Jot down your selection; we’ll be using it in a moment.
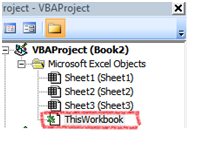
Fire up the Visual Basic editor. Since we want our Dashboard to be in the correct view whenever someone opens the file (otherwise, what’s the use?) we’re going to add some code to be executed right when the workbook is first opened. In the upper-left hand corner of the Visual Basic Editor you’ll see a box labeled Project, which contains your Microsoft Excel objects. Double click ThisWorkbook—the workbook object belonging to our project.
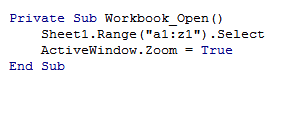
In the code window, select “Workbook” from the object dropdown on the left. Then select the “Open” method from the method dropdown on the right. The Workbook_Open() procedure should appear on the screen as shown below.

Now enter the following code into your new procedure. Remember the range I said to jot down for later? Use that range in the quotes as I have for “A1:Z1.”

In this next step you’ll want to take note of the columns spanning your screen. Above, you’ll see that I’ve selected columns “A1:Z1,” but left the final column, “AA1” unselected. I would suggest highlighting all except for the last column as I did above—when we are finished, the last column will act as a nice margin. Jot down your selection; we’ll be using it in a moment.
Fire up the Visual Basic editor. Since we want our Dashboard to be in the correct view whenever someone opens the file (otherwise, what’s the use?) we’re going to add some code to be executed right when the workbook is first opened. In the upper-left hand corner of the Visual Basic Editor you’ll see a box labeled Project, which contains your Microsoft Excel objects. Double click ThisWorkbook—the workbook object belonging to our project.
In the code window, select “Workbook” from the object dropdown on the left. Then select the “Open” method from the method dropdown on the right. The Workbook_Open() procedure should appear on the screen as shown below.

Now enter the following code into your new procedure. Remember the range I said to jot down for later? Use that range in the quotes as I have for “A1:Z1.”
Now to see if our code actually works! Go back to the spreadsheet and, for testing purposes, zoom really far out to a level that your dashboard should never go. Now save and quit. (Make sure you save it as a .xlsm macro enabled workbook.)
Open your dashboard! Neat, huh? If you want to make your dashboard super snazzy, take the row selection you jotted down above and do Merge and Center on it. Now add a nice title to it for a nifty dashboard banner.
---
There are a few things I should mention. The user might have to hit “Enable Macros” before the code takes effect, but there’s not a ton you can do about that. And if Excel wasn’t closed correctly on a previous use, that box showing unsaved files will most likely appear and your dashboard, left with less screen real estate, will probably not zoom correctly. Finally, sometimes Excel will not open to a maximized state – but you can fix this with some VBA code.
I’ve found this to be a good workaround in my projects– but I haven’t worked with every different client computer, either. Let me know what you guys think – was this useful? How do you get around displaying the same thing on different screens?


"Excel"ent.Thank you.
ReplyDeleteThank you, This is amazing!
ReplyDeleteI do pretty much the same thing but maximize all involved windows.
ReplyDeleteApplication.WindowState = xlMaximized
ActiveWindow.WindowState = xlMaximized
ActiveWindow.Zoom = False
ActiveSheet.Range("A1:J1").Select
If Selection.Width > ActiveWindow.Width Then
ActiveWindow.Zoom = True
End If
That's not a bad idea. Thanks for sharing!
DeleteHi, I get the below error when I run the code;
ReplyDelete"Run-time error '1004'
Application-defined or object-defined error
Check your code
DeleteIf it's activatewindow.zoom change it to activewindow.zoom
Hmm. The quotes in your code around A1:Z1, are they curly quotes like in the blog text - or straight quotes as in the picture of the code?
ReplyDeleteSame as that shown above the number 2 on your keyboard. By the number 2 I mean the one immediately above the Q and W keys, not over on the right where the number keys are located together.
DeleteIf I need to do it for multiple worksheets what to do?
ReplyDeletehi
ReplyDeleteis it possible to do this without macros? I have this workbook it looks nice in my screen (1080p) but on my other laptop screen (720) is just eats parts of it, any help is appreciated
It's not possible without macros. Your best bet is to create work that fits neatly in the 100 percent zoom level.
Deleteok I tried your code but it still did not work on my 720p laptop, the zoom part work so basically what happens is that in my 1080p one of the columns that contains a a couple of check boxes within a row show entirely but in my 720p some of the check boxes from within the same column and row are missing. Even the letter font is not visible in the 720p, have you ever encountered this?
ReplyDeletethanks
Redesign it to look good on the laptop at 100 percent zoom level. It's easier to resize to 1080 from 720 than the other way around.
DeleteGetting a Run-time error '424': Object Required. Any thoughts on how to fix this?
ReplyDeleteI LOVE THIS!! I have an Excel file that I share with multiple people at work. Problem is, they all have different screen sizes.
ReplyDeleteI have one issue.... I have 4 main tabs at the bottom of my Excel file. I truly only care about the auto-resize on one tab. While that part works perfectly, many of my co-workers will save the Excel file when on one of the other tabs. When they go to open the Excel doc again (I tested this), I get this:
Run-time error '1004':
Select method or Range class failed
Suggestions to fix this? THANK YOU!!!!!!!
so in the workbook close event you can add something like worksheets("dashboard").activate. This will revert the workbook to the proper worksheet upon saving. Just change "dashboard" to refer to the worksheet you're interested in.
ReplyDeletehate to be a pest, but much like you gave directions that gave me the resize solution, can you spell this out for me as to how the code should look?
ReplyDeleteYou are the man. Thanks!!
send me an email and I'll take a look at your workbook jpo645 (at) gmail
DeleteHi there! So helpful! I'm amazed and admire the people like you who take the time to help others - thanks! Question... what if I'm looking to resize multiple tabs in an Excel file; not just 1 worksheet? Is there a separate code for this? Seems like a similar question that C. Hill had above; only s/he only cared about resizing 1 tab. I want to resize multiple tabs/sheets. Do you have any ideas? Thanks! - Katie
ReplyDeleteVery helpful and simple. Thank youI saw other solutions involving GetSystemMetrics that feel too operating system-dependent.
ReplyDeleteI turn off row & column headings when I publish reports and this technique leaves more margin on the right than I would like. A simple fix is to select more columns.
Joe Anonymous
This is the only search result I can find on Google for this subject. This works great for 1 worksheet...but what if you have multiple worksheets?
ReplyDeletesame question here
ReplyDeleteFor multiple worksheets, you would do something like,
Deletedim wk as worksheet
for each wk in thisworkbook.worksheets
wk.range("...").select
activewindow.zoom = true
next
wow this is great :) works like charm...thanks!
ReplyDeleteI am new to VBA, please assume I know nothing haha I have got the following code to work for one worksheet upon workbook open:
ReplyDeletePrivate Sub Workbook_Open()
Sheet1.Range("A1:P1").Select
ActiveWindow.Zoom = True
End Sub
Can someone please provide the complete code and instructions on how I could get every sheet in the workbook to do the same thing when the user views it? Thanks
It's best to do this when the worksheet opens. I haven't tested the code, so you may have to tweak it:
DeletePrivate Sub Workbook_Open()
Dim wb as sheet
for each wb in thisworkbook.sheets
wb.Range("A1:P1").Select
ActiveWindow.Zoom = True
next
End Sub
I tried this and I get an error. Where should i put this code for the workbook or the individual sheets?
DeleteIf you scroll up someone has posted a solution to this problem that likely works better than my failed attempt :D
DeleteAppreciate your help. I tried the one above and I can't get that to work at all lol. If someone could like throw this solution into an excel file as an example i could have a much better idea of how to get it to work for my dashboards.
DeleteGreat Work, Thank you so much.
ReplyDelete